How to Set Checkbox Label on Top in Vaadin
Have you ever needed to position the label of a checkbox on top of the checkbox itself in a Vaadin application? If so, this blog post is for you! We’ll walk through the steps to achieve this using a simple method and custom CSS. Let’s get started.
What We Want to Achieve
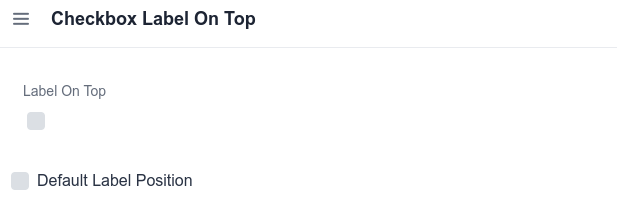
We want a clean looking UI where our checkbox has it’s label above and not on the right as is by default:

Step 1: Create the Method
We’ll create a method (for convenience) that generates a checkbox with its label positioned on top:
    public static VerticalLayout createLabelOnTopCheckbox(String id, String labelText, Checkbox checkbox) {
        NativeLabel checkboxLabel = new NativeLabel(labelText);
        checkboxLabel.setFor(id);
        checkboxLabel.addClassName("checkbox-label");
        VerticalLayout checkboxLayout = new VerticalLayout();
        checkboxLayout.addClassName("checkbox-container");
        checkboxLayout.add(checkboxLabel, checkbox);
        return checkboxLayout;
    }
Step 2: Include the necessary CSS
    .checkbox-label, .ntvLabel{
      color: var(--vaadin-input-field-label-color, var(--lumo-secondary-text-color));
      font-weight: var(--vaadin-input-field-label-font-weight, 500);
      font-size: var(--vaadin-input-field-label-font-size, var(--lumo-font-size-s));
      margin-bottom: 0;
    }

    .checkbox-container {
      display: inline-flex;
      flex-direction: column;
      align-items: start;
      margin-bottom: 0;
      gap: 5px;
      width: unset !important;
    }
Step 3: Integrate and Test
Integrate the method into your Vaadin view and test it out. Here’s a simple example of how to use it:
public class CheckboxLabelOnTopView extends VerticalLayout {

    public CheckboxLabelOnTopView() {
        Checkbox checkbox = new Checkbox();
        checkbox.setId("my-checkbox");

        VerticalLayout checkboxLayout = createLabelOnTopCheckbox("my-checkbox", "My Checkbox Label", checkbox);
        add(checkboxLayout);
    }

    public static VerticalLayout createLabelOnTopCheckbox(String id, String labelText, Checkbox checkbox) {
        NativeLabel checkboxLabel = new NativeLabel(labelText);
        checkboxLabel.setFor(id);
        checkboxLabel.addClassName("checkbox-label");
        VerticalLayout checkboxLayout = new VerticalLayout();
        checkboxLayout.addClassName("checkbox-container");
        checkboxLayout.add(checkboxLabel, checkbox);
        return checkboxLayout;
    }
}
Final Outcome
Below is the final outcome of using the method and using the default checkbox:

Feel free to mess around with the CSS properties if you want maybe a bigger checkbox size or bigger gap between components. It’s fun.
Conclusion
By following the steps, you can easily position the label of a checkbox on top of the checkbox itself in your Vaadin application.
This approach ensures a clean and user-friendly UI, making your forms look more professional.
Happy coding!